Here they are as they were poured. You can see the cup on the top.
The next step is to cut off the cup and the sprues used to vent the piece during the pour.
Your Custom Text Here
Here they are as they were poured. You can see the cup on the top.


The next step is to cut off the cup and the sprues used to vent the piece during the pour.

stratis de insectum
50" X 60" X 4"
collage and ink
The shell the day after the pour.

Looking into the shell full of bronze from the top of the cup.
The shell is broken off with a sledge hammer and a chisel. It is exciting to finally get to see the piece in bronze. Luckily the bronze got into every cavity of the shell it does not always.

Serendipity after knocking off the shell.

Serendipity with more shell cleaned off.
Next to cut off the sprues with my angle grinder.

Sprues are cut off
Here she is with the cup still attached.

Serendipity with cup attached. The fingers need some metal work.
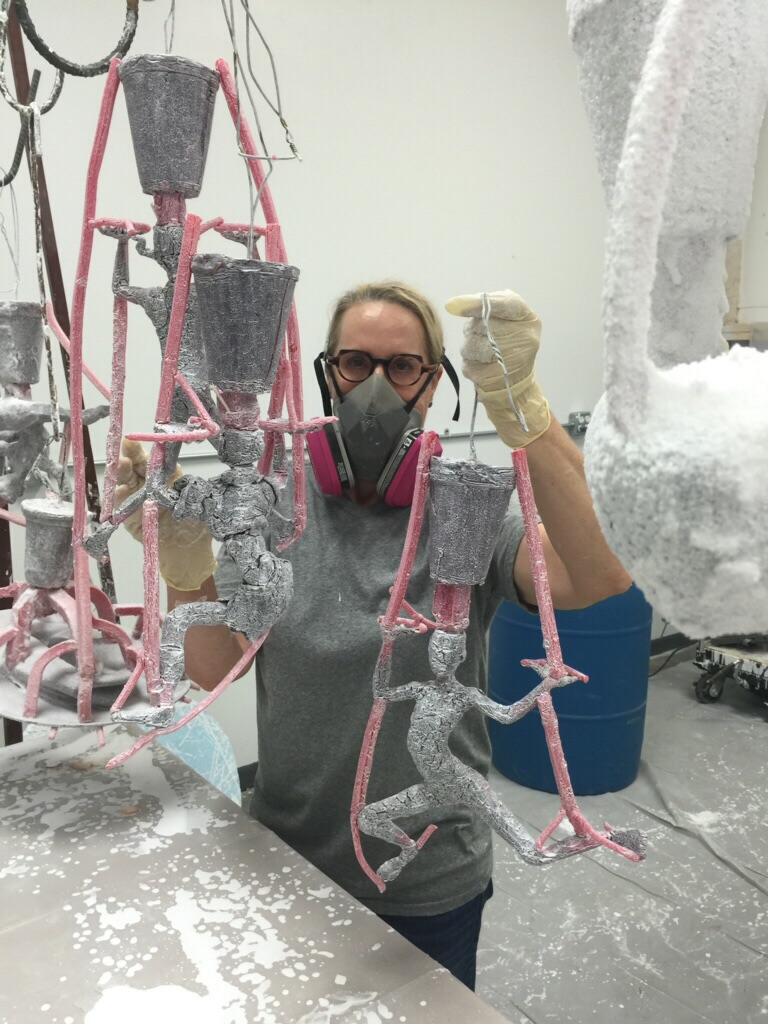
Once the sprues are detached the chasing begins.

Working on the fingers.

Removing all traces of the sprues with a pneumatic cutter.

I am almost Finished with the chasing.

The metal work is finished
The last step is applying the patina.
Keep an eye out for the patina post.
The first thing we do the day of a pour is double check each piece and make sure all cracks are patched. Then we calculate how many pounds of bronze we will need to fill each piece.

Bronze
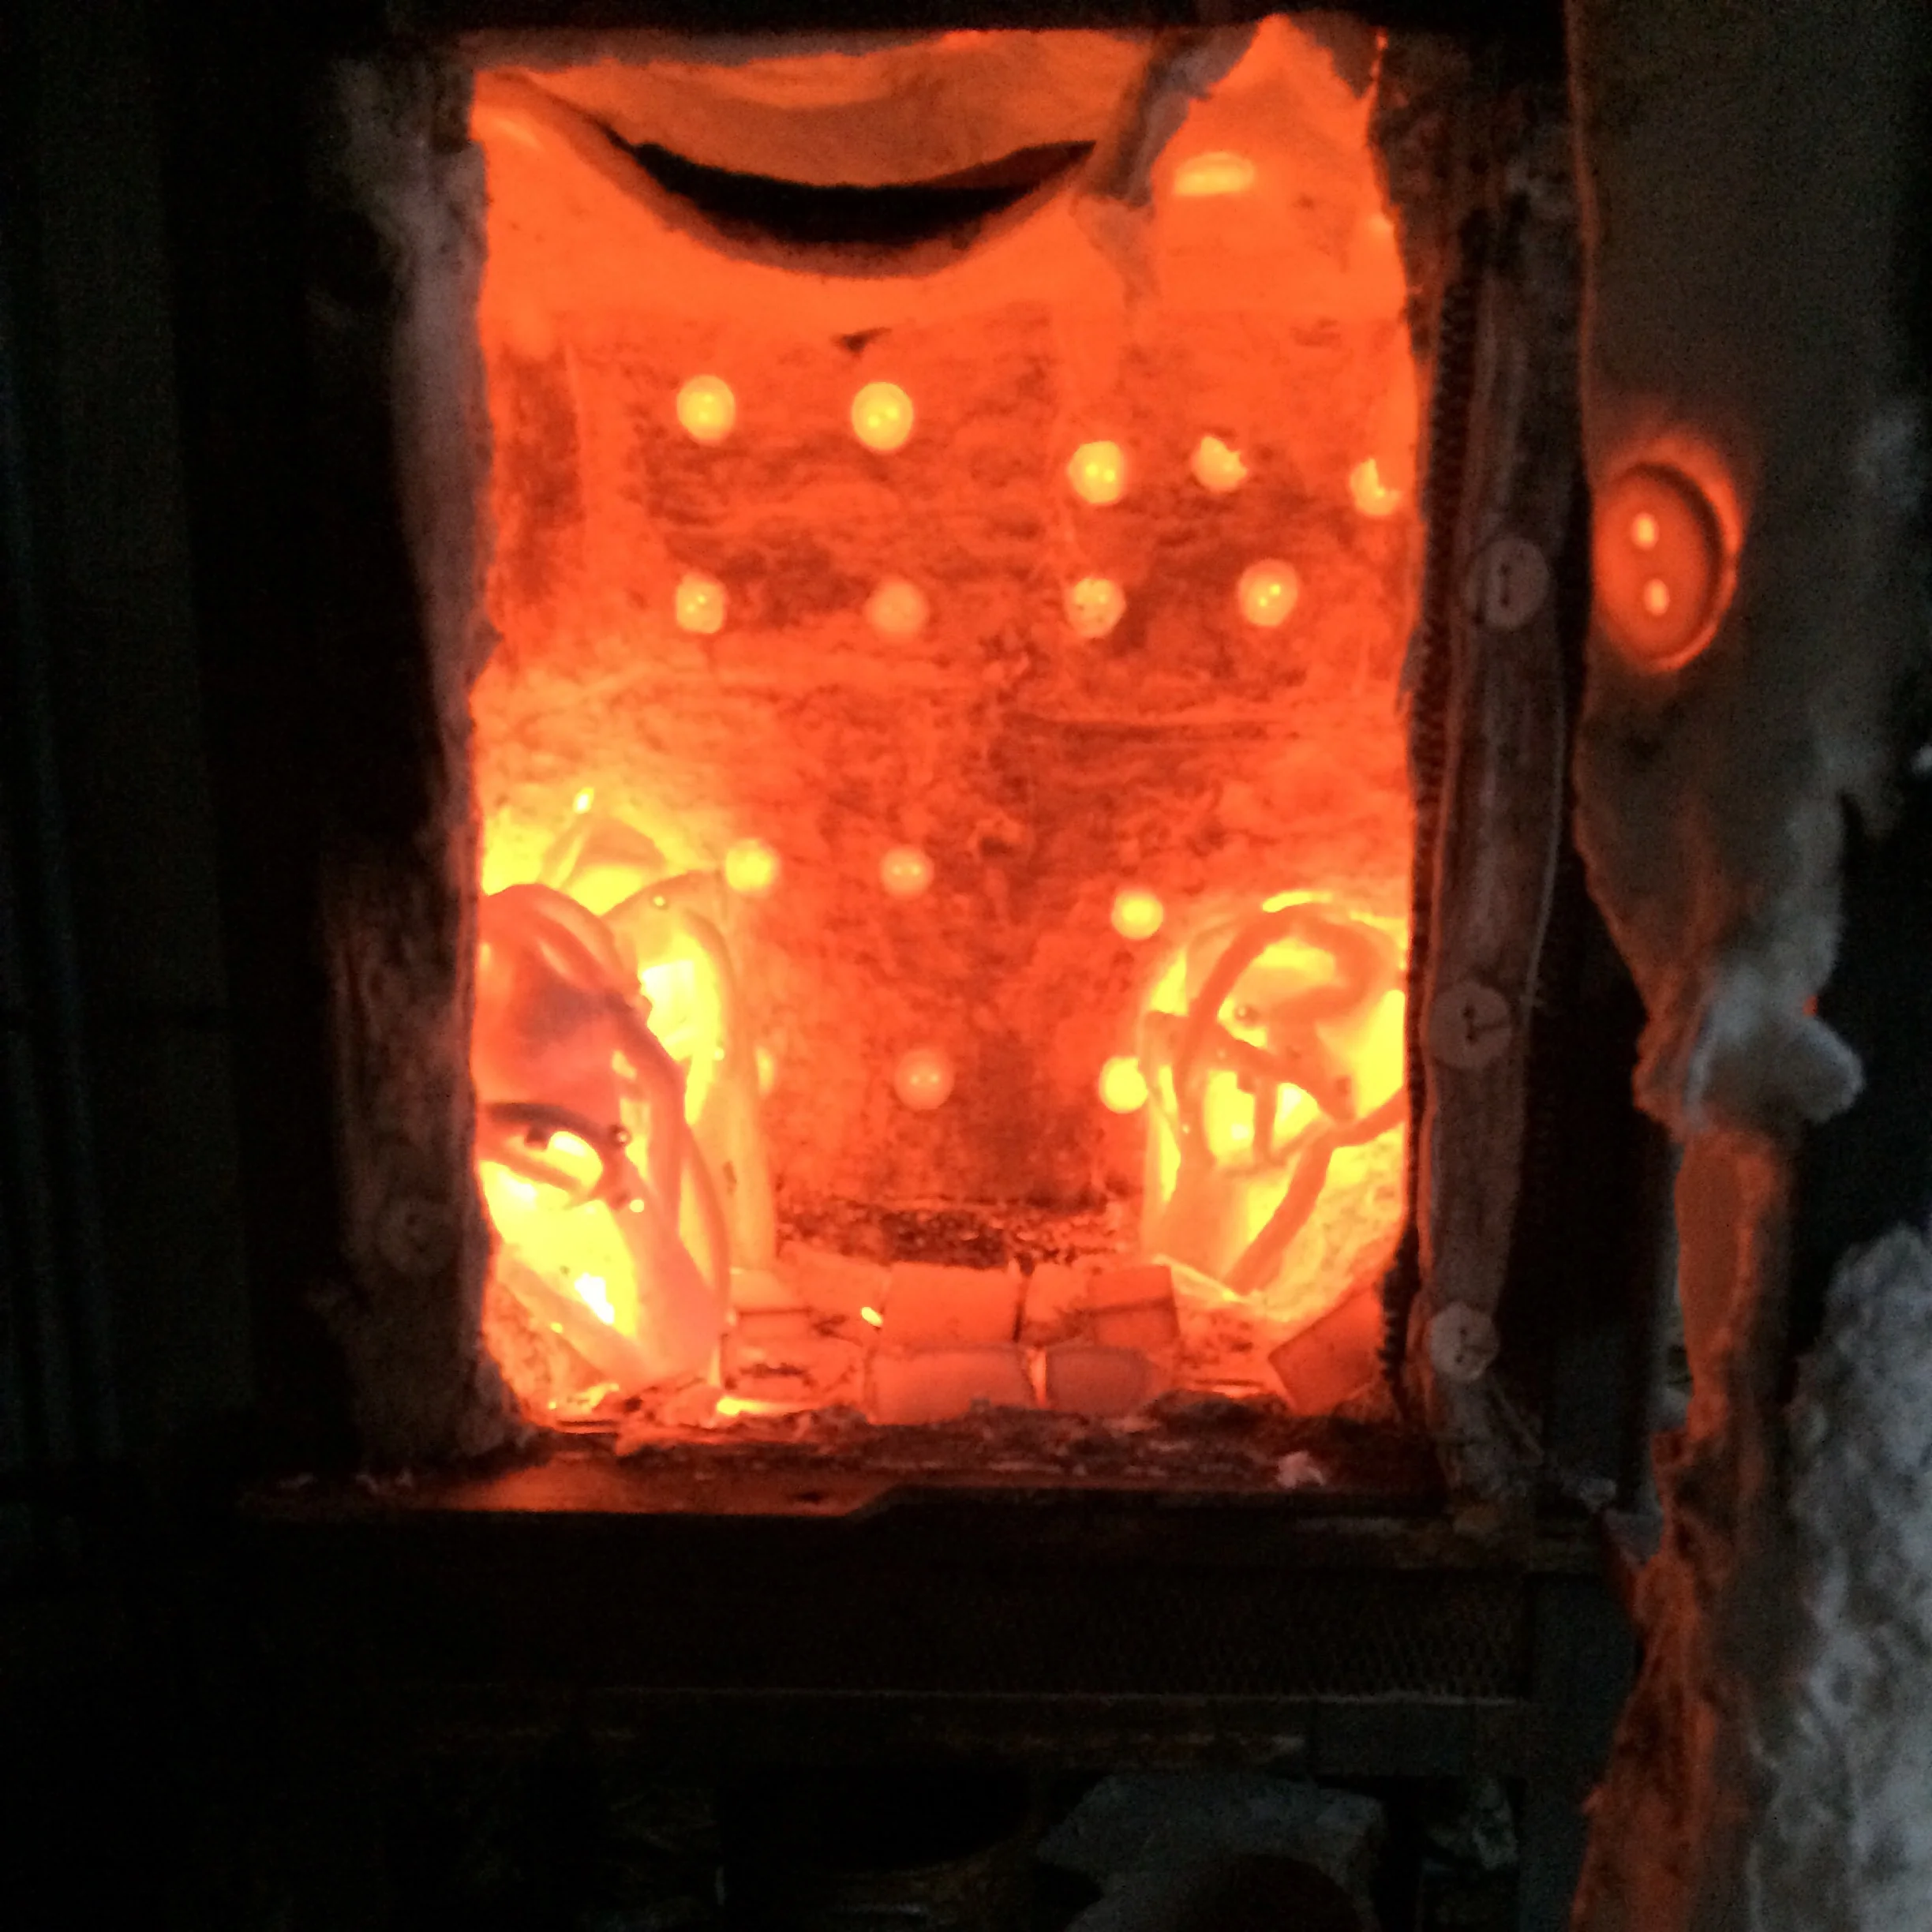
Next we weigh the bronze needed and heat it in the furnace.
As the bronze heats up the shells are put back in the kiln to preheat.
Reheating shells
While everything heats up we get metal buckets or empty file cabinets drawers (as were used the night this was filmed) and fill them about 1/3 full with sand.

Buckets of sand that will hold the shells when we pour in the bronze.
Additional buckets of sand are set aside to pour around the shells.
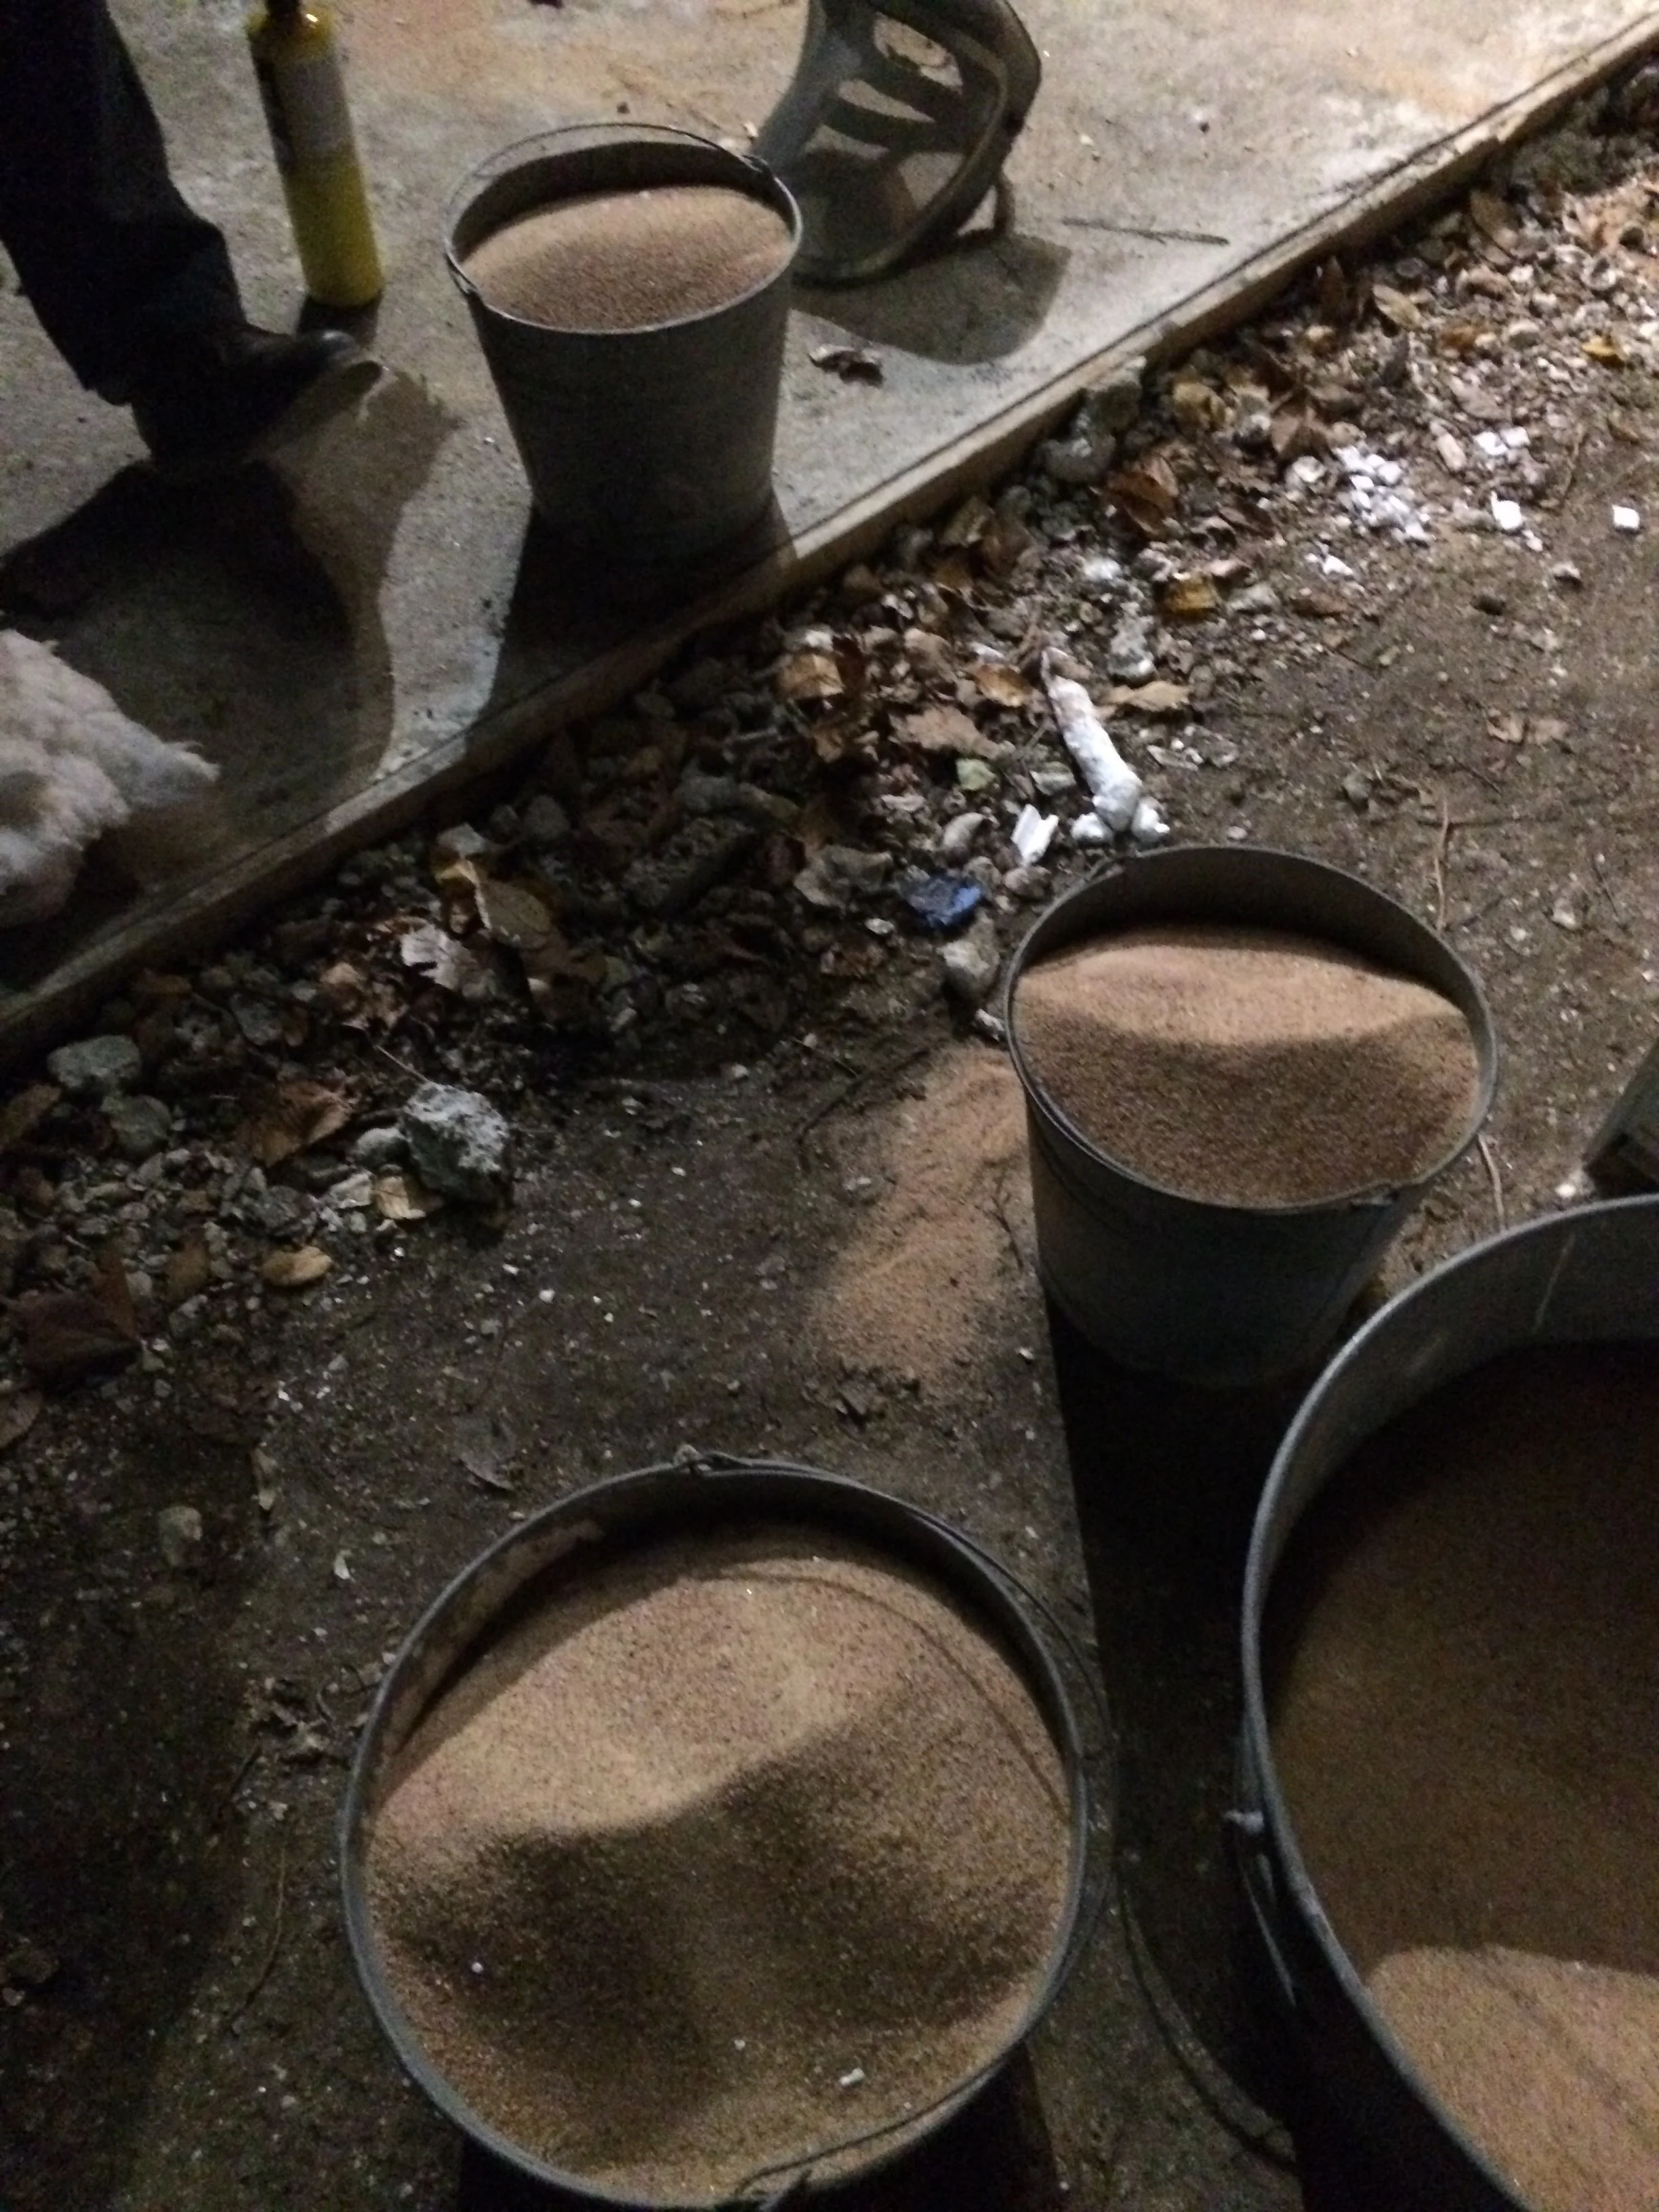
Buckets of sand ready to be poured around the shells.
Bullion molds are heated for the excess bronze.
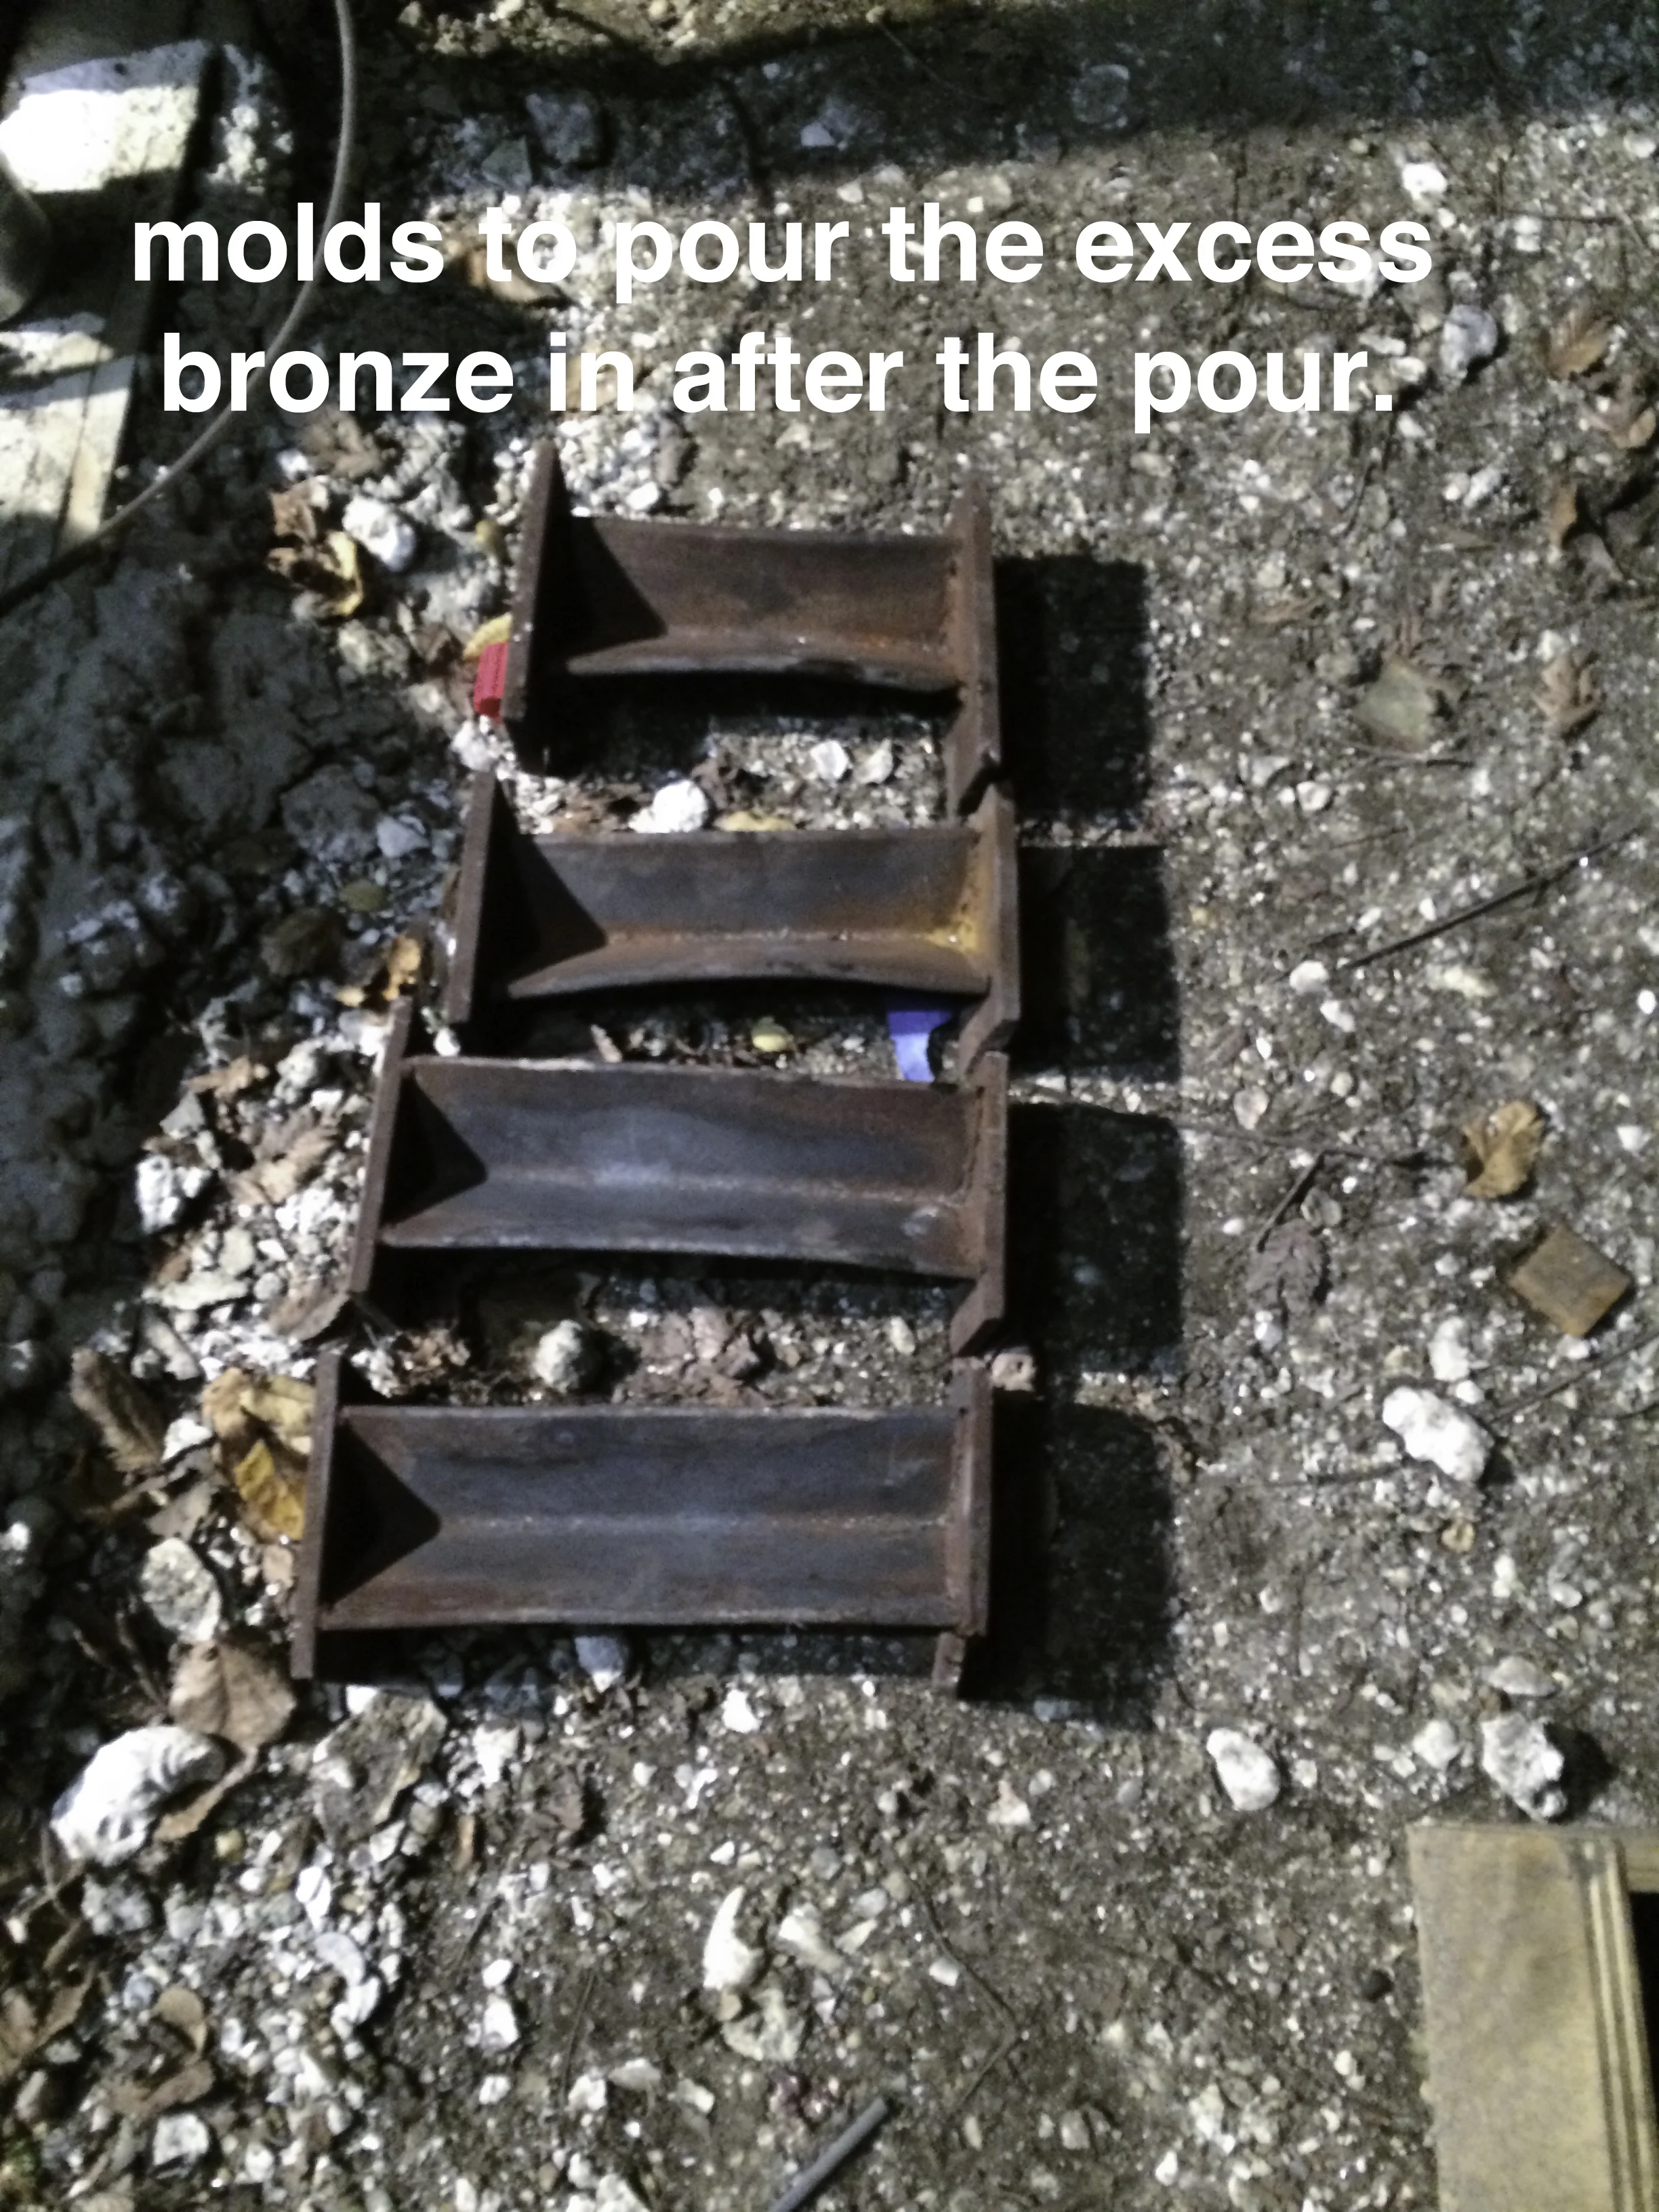
Molds for excess bronze
We all put on our leather safety clothing, gloves and helmets with screens to protect our faces should the bronze spray or squirt in our direction.

Safety apparel
When it is time to pour David with special gloves on picks up each shell and places it in one of the buckets. I with a pair of thick welding gloves and an additional pair of fire proof gloves cover the opening of the shells and hold them up while others pour sand around the pieces. The sand not only helps hold the pieces up but helps hold the heat in. Covering the opening keeps the sand from getting in the shell. Once all the shells are set up Will and Carlos lift the crucible out of the furnace with (80 lbs. in this pour) the molten bronze and set it in the fulcrum and ring. They then clean out any debris floating on top. Next they each grab and end of the fulcrum and lift the ring holding the crucible of bronze. The one that gets the pour end of the fulcrum is known as the dead man. I then remove the covers of the first shell. They pour bronze into the piece until the cup and vents remain full. I then replace the cover. We always have someone who watches for leaks, if there is a leak they quickly stick a lump of sparset on the leak. The excess bronze is poured into the bullion molds to be used in the next pour. Will and Carlos then lift the crucible back in the furnace and we all cheer.
24hrs. after the last dip of the shells we cut off the tops of the cups.
Then we cut slits in the shell to keep them from cracking when the wax heats and expands.

Shell 24 hrs. after last dip.

I used an angle grinder with a masonary cutting blade to cut off the top.
These shells are then put in the kiln cup side down and heated.

Heating in the kiln

Wax melts into bucket
The wax runs out of the shells into a bucket under the kiln. This is the lost wax casting method.
Once the empty shells have cooled we patch any cracks and all the cuts used to release the wax except the cup opening and the two main vents that exit at the top of the cup.

Shell with cracks and slits patched with sparset


"Ghostly pipes
30" X 22"
mix media on Stonehenge
It was windy as Sage put on her cap and gown in May of 2013 and prepared to take her seat for graduation. She tilted her head up and shook her head to get her hair out of her face. In that second the sun hit her face just perfect. I had just put my nice camera back in it's case so quickly I snapped this picture with my cell phone. It is my favorite graduation picture. The way she radiated a quiet happiness that moment reflects how Curtis, and I felt.

My work space

Curtis snapped this of me drawing Sage from a photo.
I am almost finished but ........ I don't know I think I need to step back and just look at for a week and see if anything bugs me.
I was offered the opportunity to curate a part of a hall in the Glassell studio school with my work from the advanced drawing class, and I jumped on it. I decided to leave "stratis de insectum" and the insectum series up and added two of my hat drawings. The subject matter and styles of the four pieces are very different but what makes it work in an eclectic way is they are: 1. all works on paper, 2. all basically charcoal, ink and oil stick. The color of the insects in the assemblage piece "status de insectum" gives the exhibit a pop and keeps it from being boring.

I left the lower corners unpinned on the hats on purpose. Once you draw on paper and use water on the paper the paper takes on a new body a new energy and life. I think it gives the work more of a 3D quality.
Julie Soldano and Barbara Gamiz took these photos.

Here I am with Carlos Garcia and Will Isabell waiting for the bronze to melt.
David Medina (not pictured) takes the shells out of the furnace and sets them in buckets of sand. I cover the cups of the shells with tiles or insulation and hold the shells upright while Will and Carlos shovel sand around the shells to hold them up. The tiles/insulation keep the sand from getting in the shells and help keep the heat in the body of the shells.

I am in all leather protective clothing. I wear two sets of welding gloves to keep from burning my hands when I hold the shells upright.

Roland who runs TXRX and I think David Medina.
These TxRxlab guys are very innovative, the bronze was melted by a furnace fueled by recycled oil. It is going to be interesting to see what comes out of the mix between Glassell artist and TXRX members

Carlos and Will lift the hot crucible of hot bronze out of the furnace and pour it into the shells. The one holding the pour end is called the dead men.
The pour went great there was not a single leak in the shells.

Squirrel sage carved out of soap when she was about 8 years old.

Here is the wax cup and main sprue that will be the main channel the bronze will flow through to get into the sculpture cavity.

Attaching the sculpture to the cup.

The vents are added to allow the gasses created during the pour to escape.
The headstands after dip #1- slurry only
The first dip is slurry only because it is wet and thin and creeps in to the tiniest crevice capturing the tiniest detail of the sculpture. It is what makes the magic happen. The other coats just protect the first coat.

I have 6 pieces under way right now.

The three headstands molds are finished and dry. ✅✅✅
Now I will cut off the top of the cups in order to melt the wax out of the molds.

The three headstands with the top of the cup cut off and slits cut to allow the gasses escape and the fluids to expand and not crack the shell.

Here she is right before I start dipping her.
I am ready to make the mold of the serendipity piece. (I am still pondering the name but for now I am referring to her as serendipity). I will dip the sprued up wax sculpture into slurry a total of 10 times and into dry silica 8 of the 10 times. The piece has to completely dry after each dip. The video clip below shows this process starting at about a third of the way through the dipping process.
Dipping serendipity

"serindipity" Her mold is finished .
Many more steps to come.....

"the perfect storm"
24" X 19"
Mixed media
I did this piece a week ago and it was one of those drawings that just happened. I didn't struggle, I didn't question if it needed more. It was the perfect storm.

10/2015
I added the Sprues- (wax that create the channels the bronze flows through in order to fill the sculpture cavity.) it is sitting in my colander so the lower sprues will not break.

Ceramic shell- after 10 dips.

I have cut off the top of the cup and cut slits in the shell to allow the expanded fluids and gases escape in the firing. II used an angle grinder to cut the shell. Mine is sitting in the top right of the picture. Yes- I have my own angle grinder.

The burnout/firing - I am sad to say it is my piece making all the smoke. Who knew wool created so much black smoke. Under the kiln is a big pot that catches the lost wax.
I am now working out of TXRX lab in eado (east of downtown houston) the temporary glassell foundry. I have to say it is a bit of a hassell but I predict it will be a great 2+ years at TxRX.
Tomorrow I will use a compressor and blow out all the debris and charred material in the shell and then fire again and ..... repeat.
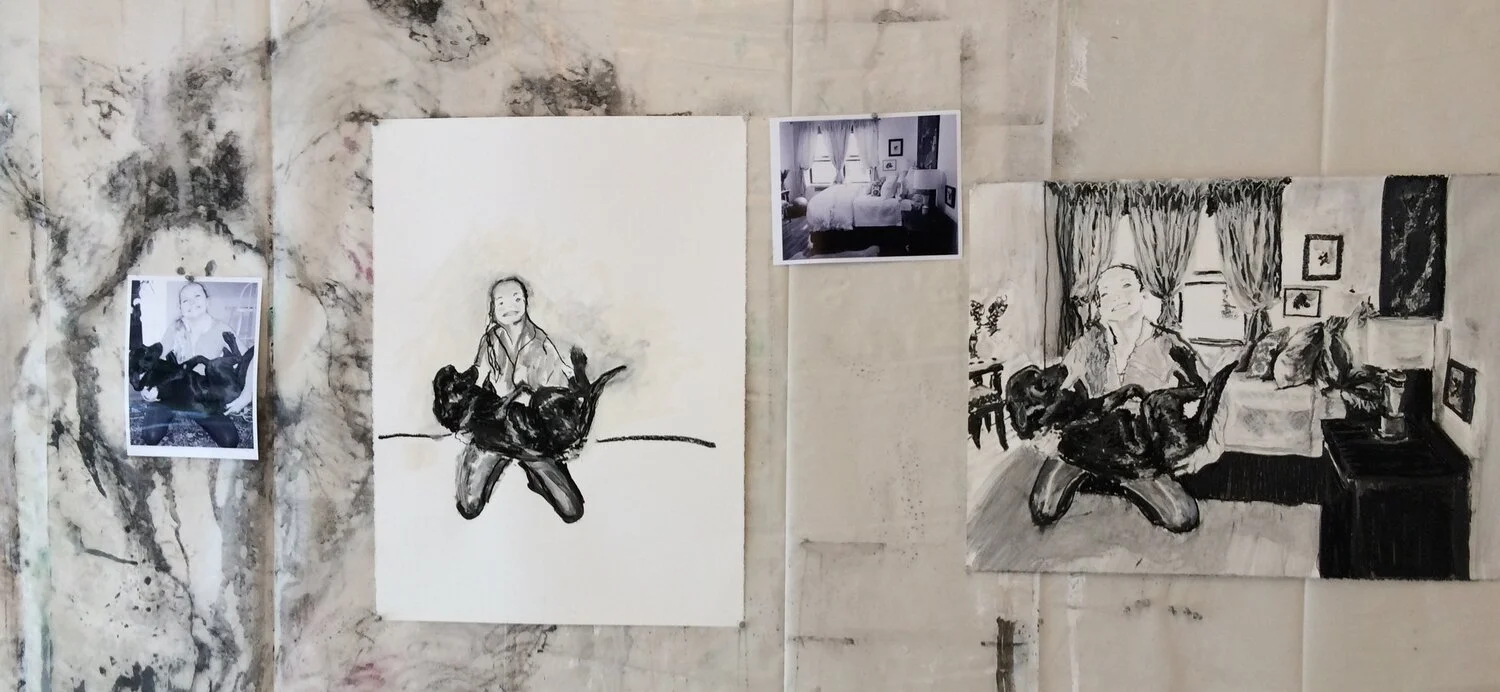
In the temporary Glassell school the administration is allowing the teachers to select work every week and exhibit it in the halls of the school. Every time I go into the building I walk every hall to see all the new work. I think everyone does. These pieces of mine are in the very furthest hall from the entrance in case you are looking. #glassell

Temporarily on exhibit at the Glassell studio school.


Insectum IV
24" X 19"
oil stick and graphite

insectum III
24" X 19"
oil stick and graphite

Insectum II
24" X 19"
oil stick and graphite

Insectum I
24" X 19"
oil stick and graphite